Getting Started with Snowflake
- 10 Mar 2025
- 3 Minutes to read
- DarkLight
Getting Started with Snowflake
- Updated on 10 Mar 2025
- 3 Minutes to read
- DarkLight
Article summary
Did you find this summary helpful?
Thank you for your feedback!
Acante's Data Access Governance platform is specifically tailored to simplify security and governance for the Snowflake platform. To integrate Acante with your Snowflake implementation, Acante has provided a set of scripts to create all the necessary roles, configurations and gather the necessary meta-data. Snowflake documentation: https://docs.snowflake.com/en/guides
Deployment Prerequisites
- Step 1 below needs to be done by the Okta admin
- Snowflake Enterprise edition or above
- Steps 2,3 need to be done by a user with Snowflake administration privileges
Sequence of Steps
There are 3 high-level steps:
- Setup the external OAuth servers using OAuth 2.0 for accessing Snowflake seamlessly with SSO
- Deploy the Acante components in Snowflake
- Add the configurations in the Acante UI
1. Setup the External OAuth Server for Authentication
We are using Okta as the Identity Provider for this example.
Create an Okta application using the API Services method.
Follow the steps as outlined in the Okta documentation to Set up your app
- Use the Application integration name as Acante-Snowflake Client
- Under the General section of the client, make sure to diable the DPoP setting.
- Note the Client ID and Client Secret in the Client Credentials section
Setup the Okta authorization server as described here
- Audience: Snowflake Account URL
Once complete you will see the Authorization Server configurations. You can now configure the Scopes and Access Policies

- Under Scopes --> Add Scopes to define required scopes as shown in the example screenshot below - ``session:role:ACANTE_MANAGEMENT_ROLE```
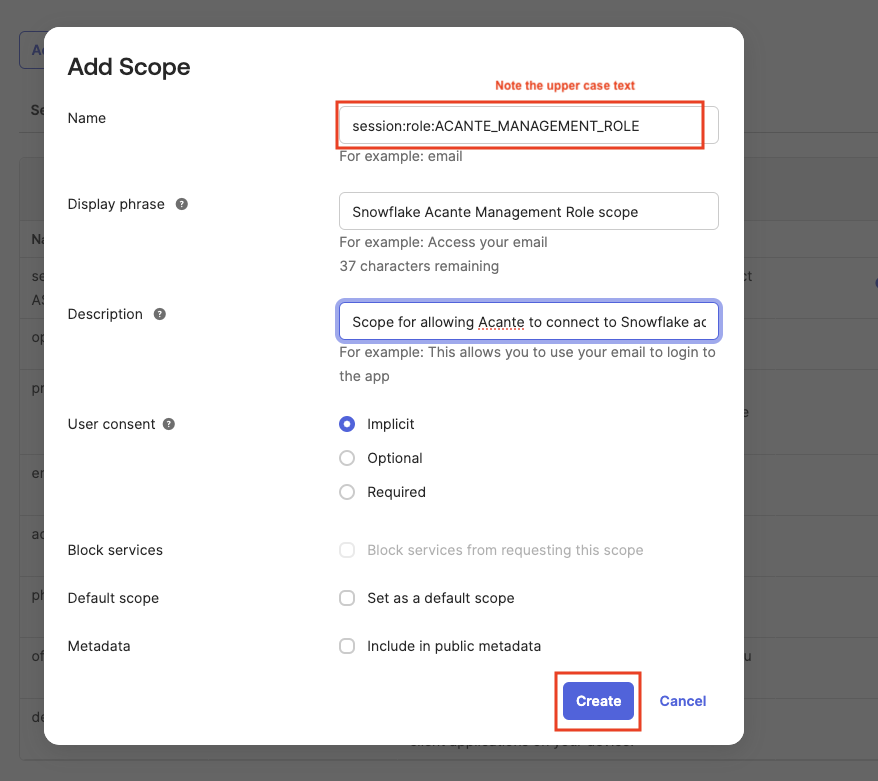

Repeat the same for the scope session:role:ACANTE_CLASSIFICATION_ROLE
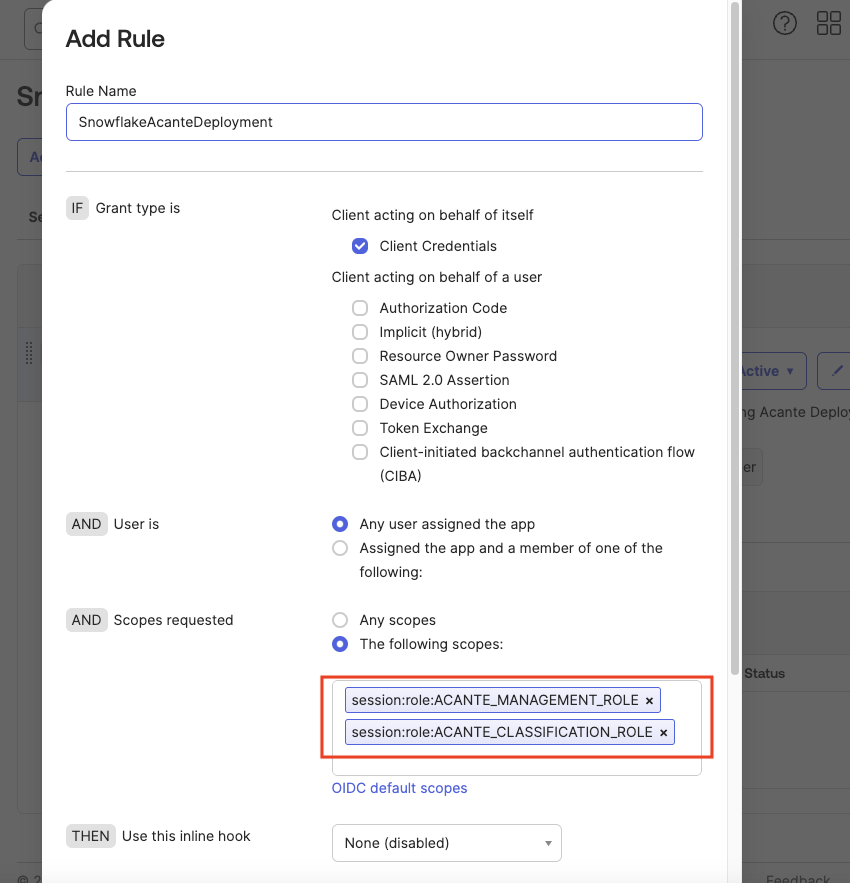
- Add a New Access Policy and in the modal assign the Client created in the previous step as shown below.

- Click Add Rule to bring up the modal to create a rule which configures the allowed roles as scopes using the
session:roleas prefix.

Note the following information for the Authorization Server
Back on the Settings tab of the Authorization Server, click on the Metadata URI field to bring up the configurations for the Server. Note the information for the fields mentioned below:
issuer --> OKTA_OAUTH_ISSUER_URL (e.g "https://dev-1234567.okta.com/oauth2/abcdefghijk")
jwks_uri --> OKTA_OAUTH_JWKS_ENDPOINT (e.g https://dev-1234567.okta.com/oauth2/abcdefghijk/v1/keys )
token_endpoint --> OKTA_OAUTH_TOKEN_ENDPOINT (e.g https://dev-1234567.okta.com/oauth2/abcdefghijk/v1/token)
Previously captured Client ID & Client Secret
Deploy the Acante Components in Snowflake
Log in to the Acante UI
Navigate to the Configurations --> Snowflake section and Download the Scripts.

The downloaded folder has 2 relevant files:
- Acante Provisioning Script: this script creates the users and the necessary resources (database, stage for metadata, etc.) and worksheet to collect metadata.
- Discovery Module: this module collects the necessary metadata (schemas, users, configurations, and so on). It does NOT have privileges to read the actual data in your Snowflake account.
Log in to your Snowflake account as Account Admin
- Create the following two Snowflake Objects for Acante:.
A Snowflake Database called ACANTE_DATABASE

A Snowflake Internal stage called ACANTE_STAGE in this database within the PUBLIC schema.


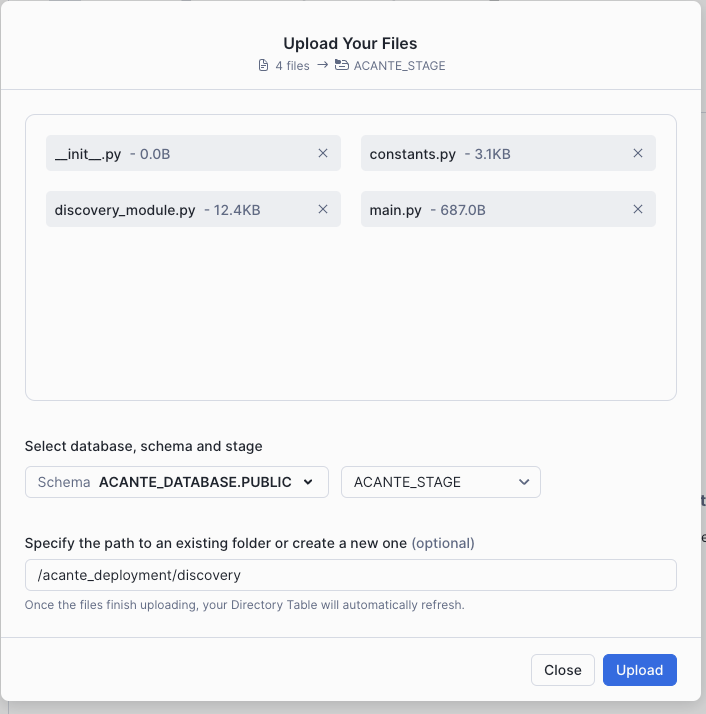
Upload the Discovery Module into ACANTE_STAGE under the folder
acante_deployment/discovery
Create a SQL worksheet from the Acante Provisioning Script (from your local machine). Rename the worksheet to Acante_Provisioning


- Configure the following values into the Acante_Provisioning worksheet: it has the variables section at the top as outlined below
/* beginning of variables section */
/* OAUTH configuration section */

--- set this variable to the client ID of the application created in your IDP
SET CLIENT_ID='<CLIENT ID>';

--- set this variable to the issuer URL of the authorization server created in your IDP
SET ISSUER_URL='<OKTA_OAUTH_ISSUER_URL>';

--- set this variable to the JWKS URL of the authorization server created in your IDP
SET JWS_KEYS_URL='<OKTA_OAUTH_JWKS_ENDPOINT>';

--- set this variable to the Snowflake Account URL
SET ACCOUNT_URL='<Snowflake Account URL>';

--- set this variable to the Oauth Token endpoint of the authorization server created in your IDP
SET TOKEN_ENDPOINT_URL='<OKTA_OAUTH_TOKEN_ENDPOINT>';

/* ACANTE Variables Section: Modify these variables ONLY IF you want to override the defaults */

- - -
/* end of common variables section */
Run the entire worksheet.
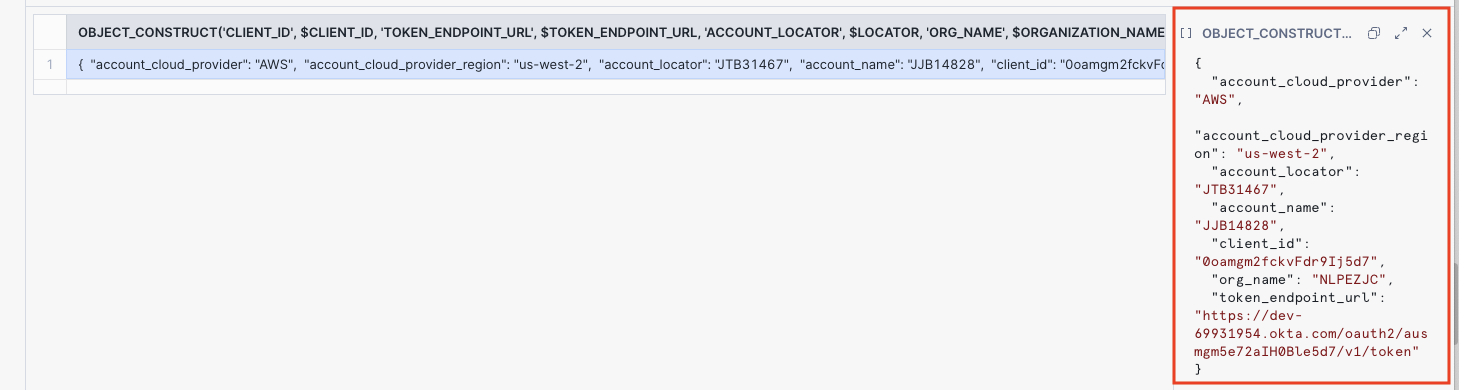
Note the output of this worksheet. The JSON output (Account Onboarding Parameters) will be used as a configuration in Acante.
Share the worksheet if necessary with other members of the DevOps team

Add the Configurations in the Acante UI
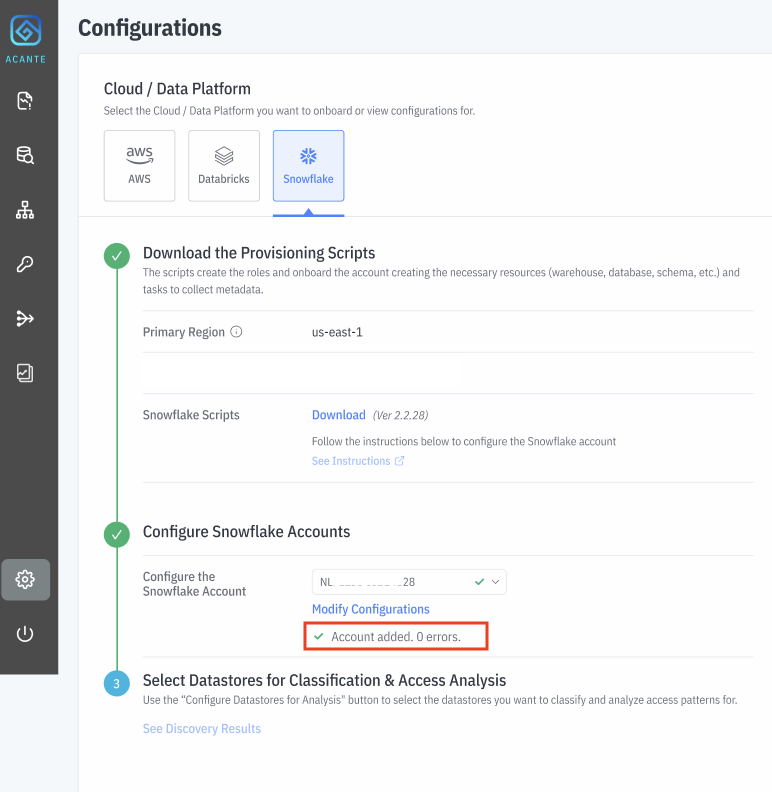
Log in to the Acante UI and navigate to the Configurations page → Snowflake tab
Click on Select Account and Add New Account . Alternately, you can also modify configurations for a previously configured account.

Enter the previously gathered configurations into the input box
Snowflake Account Identifier (from the Snowflake console)
Secret Key (Client Secret from Step 1)
Add Account Onboarding Parameters, the JSON output from the worksheet. Copy paste the entire JSON into the editor box
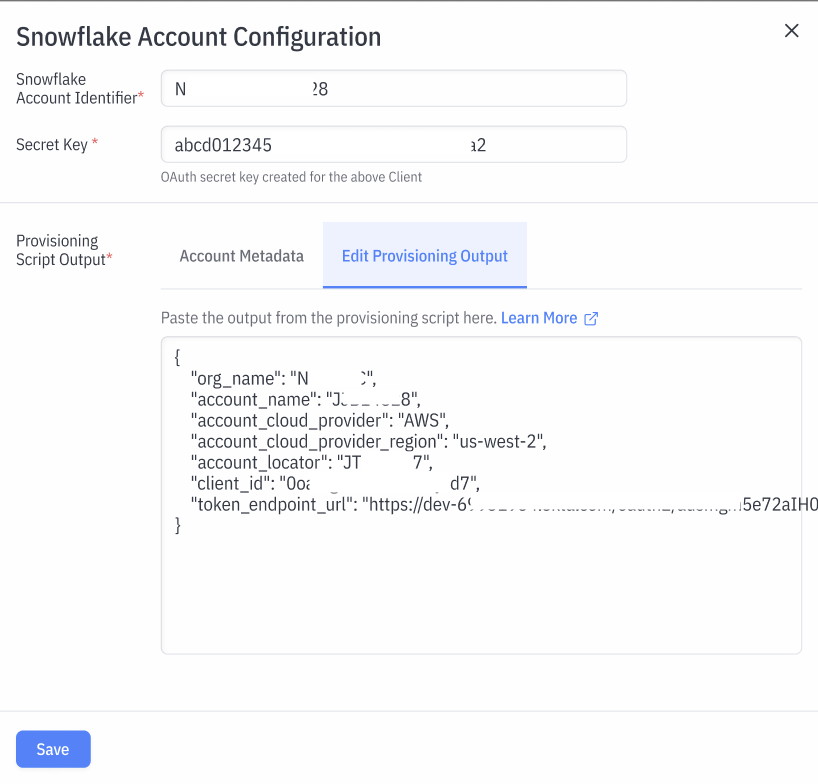
Press Save
Acante will check and confirm the connection to the account or indicate if any it encountered any error