- 28 Feb 2024
- 2 Minutes to read
- DarkLight
Product Deployment Guide
- Updated on 28 Feb 2024
- 2 Minutes to read
- DarkLight
Identify, Understand & Reduce Data Risks in the Cloud
With a completely agentless deployment that takes less than 15 mins, the process described below will enable a holistic assessment of Data Risk in your cloud environment. The Key Product Capabilities are described in this section.
Acante Agentless Deployment Architecture
Acante's is deployed as a "Hybrid SaaS" architecture to provide both ease of deployment and ensure security of customer data. All sensitive customer data remains in the customer environment, only meta-data is sent back to Acante Cloud to power the Web UI. Details of the architecture are here
Deploy as Easily as 1-2-3
Once you sign-in to the Web UI, start with the Configurations tab and follow the 3 steps below.

NOTE: Please make sure to check in the Terraform code to your Git repository.
1. Deploy the Acante Components
Acante provides a Terraform module to deploy the Acante components in the customer account. The deployment module is availble in the Configurations tab in the UI as a tar.gz. The simple process involves running a single Terraform Root Module. Unpack the tar file and run the single command in the README. Terraform provisions the entire deployment in the background in less than 15 minutes.
Few pointers for the inputs variables in the tfvars:
- If Macie had been previously enabled by Acante, disable the flag for Macie i.e set
enable-macie = false - If deploying this Terraform for the first time, consider breaking the deployment into 2 steps. In the first step:
- Deploy classification components first (this is the default setup)
- Configure Cloudtrail & Cloudwatch in the second step i.e. set the log processing flags to false in the first deployment
enable-cloudtrail-logs-processing = falseenable-cloudwatch-logs-processing = false
- Defaults have been pre-populated for all other configurations
2. Add the Discovery Role in Acante UI
The deployment process above outputs the cross-account Discovery role ARN (trusting-account-discovery-service-role-arn). Add this in the Configuration page of the Acante UI. Acante uses this role to discover the datastores across your cloud, their configurations and access policies. It does not enable scanning of or have access to any sensitive data in the datastores.
3. Select Datastores to Analyze
In a few minutes the Acante Discovery service (within the Acante Cloud) immediately starts discovering all the data resources in the customer account configured. Once the Discovery process completes, the "See Discovery Results" link will be active. Click to go to the Data Discovery & Posture tab.
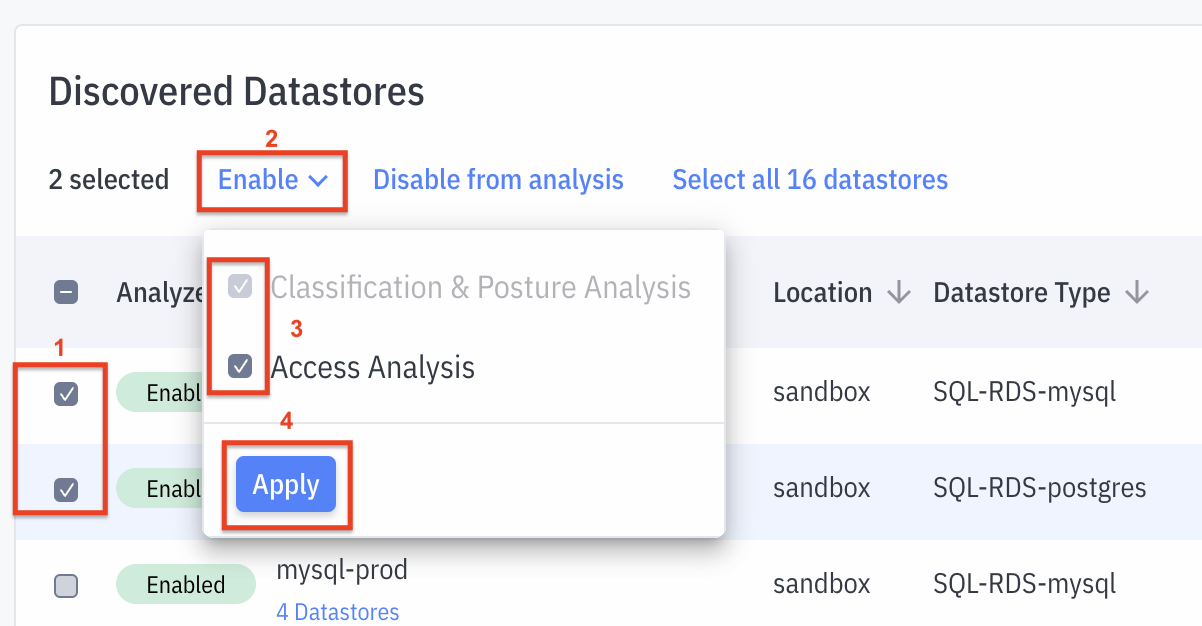
Here you can select which datastores will be analyzed. Click on the Enable for Analysis button to make selections

- Select the datastores on interest,
- Click Enable
- Select the analyses to run
- Datstores can be enabled for classification, posture and access privilege analysis (default selection - Classification & Posture Analysis)
- [Optionally] Datastores can also be enabled for analysis of access patterns and advance access privileges to surface least-privilege recomendations and guided workflows (Access Analysis)
- Click Apply to save the selections
- Confirm Changes

To disable certain datastores, follow the same sequence but instead of click Enable, use the Disable from analysis selection and Confirm Changes.
Checklist for RDS
Check this page to ensure your RDS configurations match the expectations of the above deployment.
Maintaining the Terraform .tfvars Input File
The input variables file (dev-<region>-ws.tfvars) created in the Terraform deployment proces needs to be maintained by you, preferably in a source control repository. All subsequent updates to the inputs should be added to this file. Any changes in these inputs will trigger Terraform updates when you apply the plan again.


